localhost refused to connect: 6 Ways to Fix |
您所在的位置:网站首页 › ftpconnection refused › localhost refused to connect: 6 Ways to Fix |
localhost refused to connect: 6 Ways to Fix
|
Introduction The "localhost refused to connect" error occurs when there is a network connectivity issue, such as an overly restrictive firewall or misconfigured port settings. Identifying the source of the error can be challenging due to the number of factors that can contribute to the issue. This article explains the most common causes of the "localhost refused to connect" error and shows how to resolve it. 
Prerequisites Administrative privileges on a Linux, Windows, or macOS system. XAMPP installed (optional). WAMP installed (optional). What Causes the "localhost refused to connect" Error?The localhost hostname is reserved for the loopback network interface. This interface allows users to connect to network services on the host system. When a user pings localhost, the request remains on the local network, and the server forwards it to the host machine. If such a connection is impossible, the browser displays an error message. 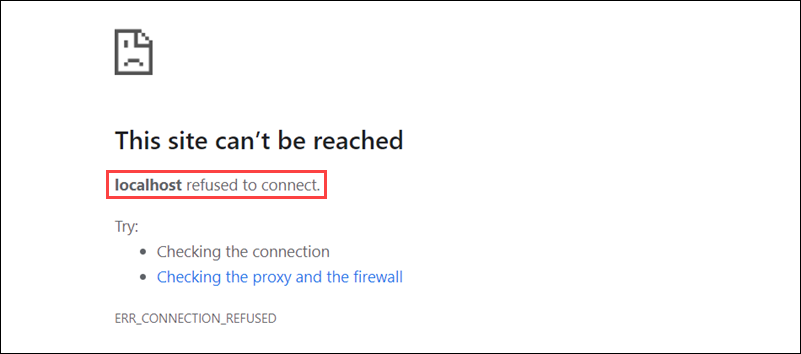
Two errors result in the browser showing the "localhost refused to connect" message: ERR_CONNECTION_REFUSED means that the server rejected the connection request. ERR_CONNECTION_TIMEOUT appears when the server has not responded to the connection request.The following is a list of common causes that result in localhost refusing to connect: The firewall blocks the loopback IP address. Misconfigured or overly strict firewalls may block the localhost address and prevent the traffic from reaching the destination. localhost does not resolve to the correct IP address. 127.0.0.1 is the default loopback address used by localhost. If localhost resolves to another address, additional configuration may be necessary. Apache issues block localhost. These issues can arise from misconfigured Apache Web Server settings. DNS cache is corrupted. Corrupted cached DNS records may prevent localhost connections. The server is being accessed from the wrong port. Apps communicate with the network using an IP address and a port. Wrong port settings may prevent localhost from connecting even if the loopback IP address is correctly set up. Browser settings are blocking the connection. How to Fix the "localhost refused to connect" ErrorTo resolve a localhost issue, eliminate potential reasons until you identify the source of the problem. The sections below provide troubleshooting steps to fix the "localhost refused to connect" error. Temporarily Disable the FirewallCheck whether the firewall settings block the localhost connection by temporarily disabling the firewall. Read the sections below for OS-specific instructions. Note: For security reasons, remember to turn the firewall back on after this step. Disable the Firewall on LinuxThe firewall configuration tool on Linux systems varies depending on the distro. While Ubuntu and Debian distributions use UFW, Rocky Linux, AlmaLinux, and RHEL systems use firewalld by default. To disable the UFW firewall on Ubuntu/Debian, open the terminal window and run the following: sudo ufw disable
Check the status by running: sudo ufw status
To disable firewalld on Rocky/RHEL, use the command: sudo systemctl stop firewalldVerify the status is inactive by running: sudo systemctl status firewalld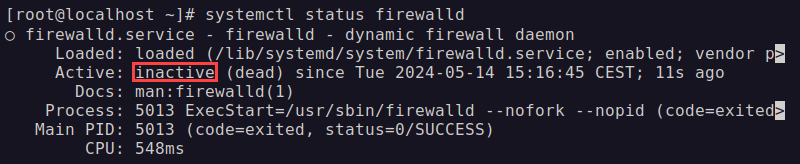 Disable Firewall on macOS
Follow the steps below to turn off the firewall on macOS using the System Settings app: 1. Click the Apple icon in the upper-left corner to open the menu and select System Settings. 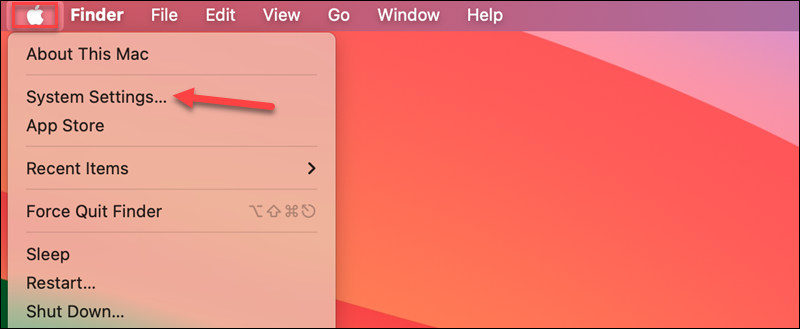
2. Navigate to Network settings and select Firewall. 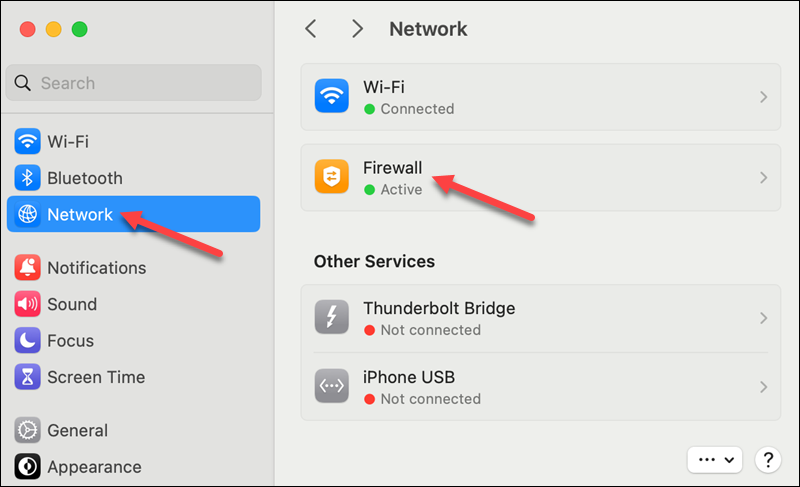
3. Turn off the firewall to complete the process. 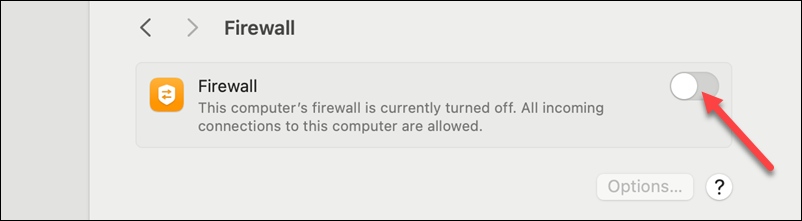 Disable Firewall on Windows
Disable the Windows Defender Firewall by executing the following steps: 1. Press Windows + R to open the Run command window. 2. Type control and click OK. 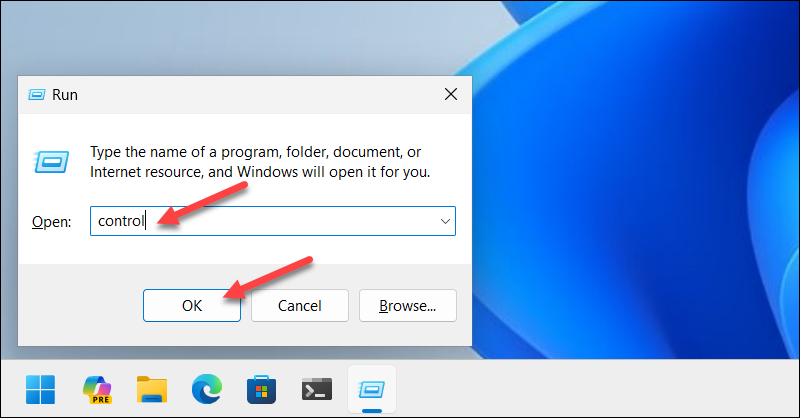
A Control Panel window opens. 3. Select System and Security. 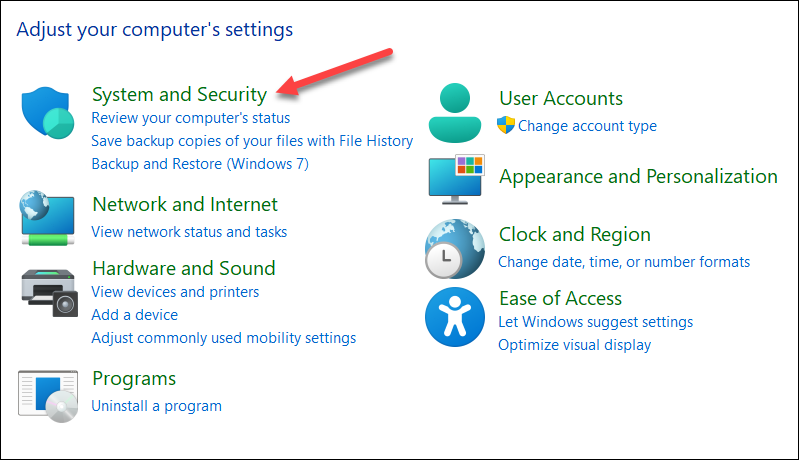
4. Select the Windows Defender Firewall option. 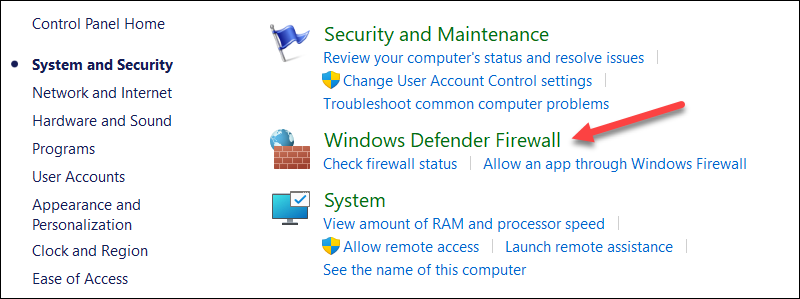
5. Choose Turn Windows Defender Firewall on or off in the menu on the left side of the window. 
6. Disable Windows Defender Firewall. 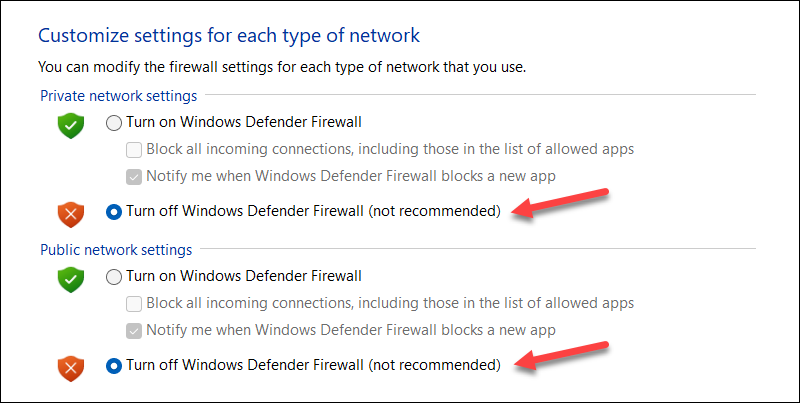 Check Localhost IP Address
The localhost hostname and the loopback IP address 127.0.0.1 are not always the same thing, e.g., IPv6 systems link the localhost to the address 0:0:0:0:0:0:0:1. Also, localhost can link to any local IP address if the host file has been modified. Note: Learn more about the differences between localhost and 127.0.0.1 in our article localhost vs. 127.0 0.1. Troubleshoot the "localhost refused to connect" error by entering 127.0.0.1 in the browser search bar. If the browser establishes the connection with localhost, the error was caused by the faulty localhost hostname mapping in the host file. Check Apache Server StatusApache server needs to run correctly to enable localhost access. The command to check whether Apache runs on a Linux OS depends on the distribution. Follow the steps below and use the appropriate command: 1. Verify Apache status on Ubuntu and Debian with the following command: sudo systemctl status apache2On Rocky Linux and RHEL, the Apache service name is httpd: sudo systemctl status httpdThe output should show Apache as active (running). If Apache is not working correctly, the output displays an inactive (dead) status. 
2. To fix the issue, try restarting the service. To restart the Apache service on Ubuntu and Debian, execute the command below: sudo systemctl restart apache2On Rocky Linux and RHEL, type: sudo systemctl restart httpdRecheck the Apache status. If the web server remains inactive, reinstall Apache. Note: Depending on your preferred distribution and development stack, you may find the following guides useful: How to Install the Apache Web Server on Ubuntu How to Install LAMP in Ubuntu How to Install XAMPP on Ubuntu How To Install XAMPP On CentOS/RHEL 7.0 Flush DNSA DNS cache speeds up the loading of previously visited websites. If DNS collects too many records or some records get corrupted, localhost may refuse to connect. The best way to ensure DNS is not preventing the localhost connection is to clear (flush) the DNS cache and remove all saved DNS lookup information. The steps for flushing the DNS vary depending on the OS in use: To flush DNS on Linux, execute the following command: sudo /etc/init.d/nscd restart On macOS, use the killall command below: sudo killall -HUP mDNSResponder Flush DNS on Windows with the ipconfig command: ipconfig /flushdns Change Port SettingsBy default, localhost uses port number 80. If another application uses the same port, it can create a conflict, resulting in localhost refusing to connect. The following sections describe how to change port settings on two popular stacks, XAMPP and WAMP. Change Port Number on XAMPPIf you are using the XAMPP stack, follow the steps below to change the Apache Web Server port: 1. Open the XAMPP manager: sudo /opt/lampp/manager-linux-x64.run2. Click the Manage Servers tab. 3. Choose the Apache Web Server from the server list and select Configure on the right side of the window. 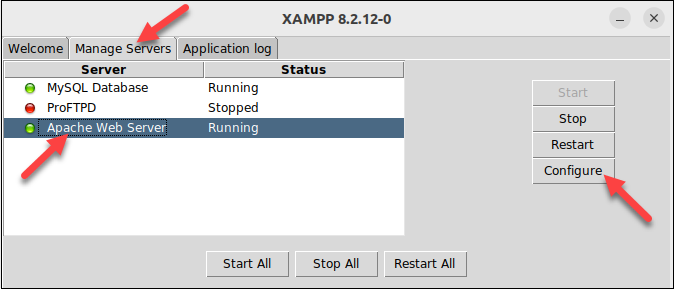
4. Type another port number in the Port field, e.g., 8080. 5. Click OK and select Yes in the pop-up to confirm the changes and restart the server. 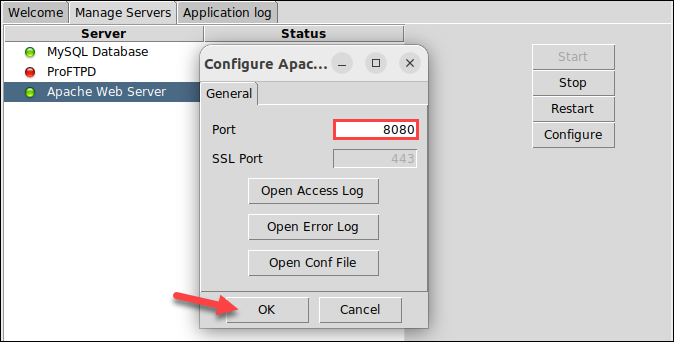 Change Port Number on WAMP
Follow the steps below to change the Apache port with the WAMP software stack: 1. Stop all instances running in WAMP. 2. Open the httpd.conf file located in C:\wamp\apache2\conf. 3. Locate the Listen directive in the file and change the port number from 80 to a free port, e.g., 8080. 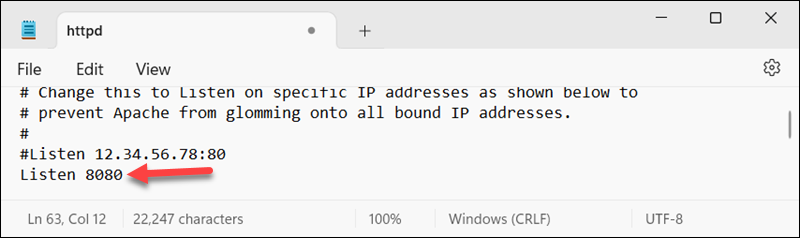
4. Find the ServerName value and change the port number to the one defined in the Listen directive. 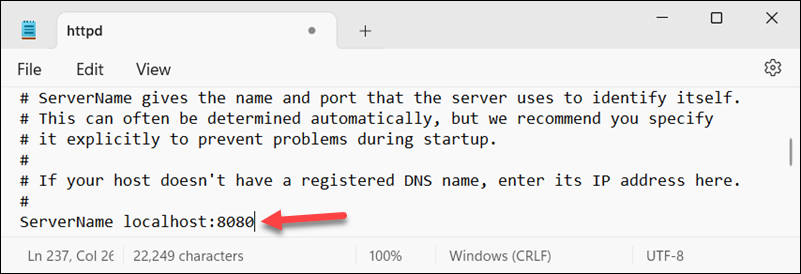
Save the changes and exit the file. Check Browser SettingsBrowsers often automatically redirect HTTP addresses to HTTPS, causing the "localhost refused to connect error." Navigate to localhost in a different browser to ensure the browser is not responsible for the error. If the connection is established, follow the steps below to troubleshoot the DNS configuration issues on the faulty browser. Change DNS Settings in ChromeThe procedure below describes how to remove localhost from Chrome's dynamic HSTS policy, which automatically redirects HTTP to HTTPS: 1. Paste the following URL in the address bar: chrome://net-internals/#hsts2. Select Domain Security Policy from the menu on the left side of the window and scroll down to the Delete domain security policies section. 3. Add localhost as the domain name and click Delete. 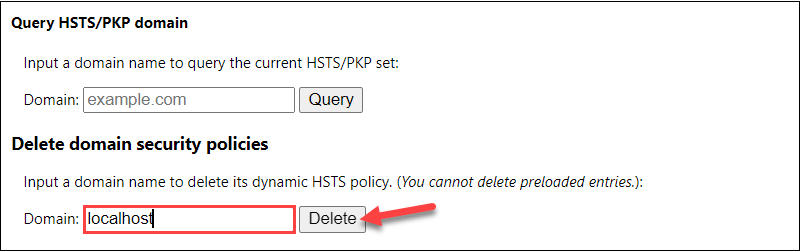
4. Restart the browser to apply the changes. Change DNS Settings in FirefoxDisable the HTTPS-only mode in Firefox to test if it resolves the localhost issue: 1. Select Settings from the Application Menu in the top right corner of the browser window. 2. Navigate to Privacy & Security and scroll to the HTTPS-Only Mode section. 3. Select Don't enable HTTPS-Only Mode. 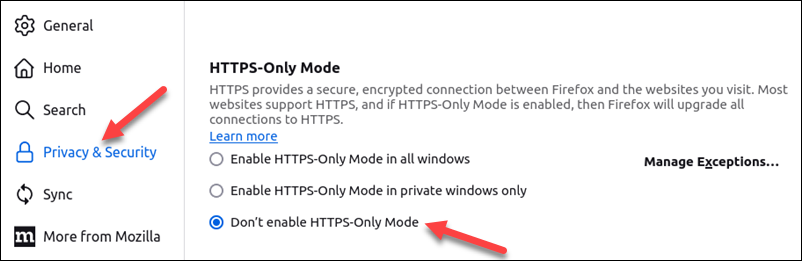
Restart the browser to apply the changes. Conclusion After reading this article, you can troubleshoot the cause and fix the "localhost refused to connect" error. The article presented multiple ways to resolve the error on all major operating systems. Next, speed up and streamline web application deployment by learning how to install Apache on Docker. |
【本文地址】